How the Styles and Formatting pane works in Microsoft Word 2002 and 2003
Quick Reference: Styles and Formatting Pane
Word does not create new styles.
If you tick the box at Tools > Options > Edit > Keep Track of Formatting, then the Styles and Formatting pane will list all combinations of formatting ever used in the document.
In Word 2002, Microsoft introduced the Styles and Formatting pane. It's quite a change over the way that styles and formatting were handled in earlier versions of Word. This web page describes how it works. The screenshots here are from Word 2003, but broadly the information applies to Word 2002 and Word 2003.
Contents
- Big idea 1: The Styles and Formatting pane doesn't list all your styles
- Big idea 2: Word 2002 and 2003 can keep track of the formatting you've used in the document
- Big idea 3: The S&F pane identifies the type for each style
- Big idea 4: Word doesn't create new styles!
- What can I do with the Styles and Formatting pane?
- How can I see and use the old Format Styles dialog box instead of the new Styles and Formatting pane?
Big idea 1: The Styles and Formatting pane doesn't list all your styles
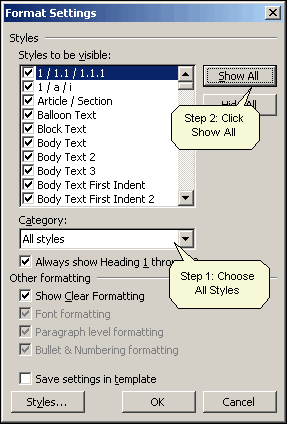
Figure 1: How to see all your styles in Word 2003.
Every bit of formatting in Word depends on styles, whether you choose them explicitly or not. If you're going to use Word effectively or efficiently, you need to know about styles.
Word comes with dozens of built in styles. But, by default, Word hides them all. That's akin to Boeing making a new jet and hiding the cockpit controls in a locked cupboard in the galley. You have to expose them all.
How to see all your styles.
- Format > Styles and Formatting. On the right, you'll see the the Styles and Formatting task pane.
- In the Show box, select Custom. (No, don't choose 'All Styles'. Microsoft's idea of 'All Styles' does not mean all the styles. True!)
- You'll now see the Format Settings dialog box. From the Category list, choose "All Styles". Then click Show All. And click OK. See Figure 1.
- Back in the Styles and Formatting pane, in the Show box, choose All Styles.
Big idea 2: Word 2002 and 2003 can keep track of the formatting you've used in the document
Go to Tools > Options > Edit. If you tick the Keep Track of Formatting box, then Word will keep track of the formatting you have ever used in this document.
And, the options in the Show box in the Styles and Formatting pane will reflect your choice (Figure 2 and Figure 3).
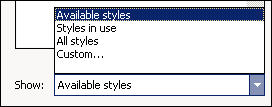
Figure 2: When you tell word not to Keep Track of Formatting, the Show box in the Styles and Formatting pane only allows you to see information about Styles.
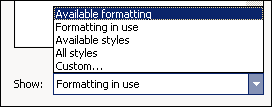
Figure 3: When you tell Word to keep track of formatting, the Show box in the Styles and Formatting pane allows you to see Available Formatting.
Big idea 3: The S&F pane identifies the type for each style
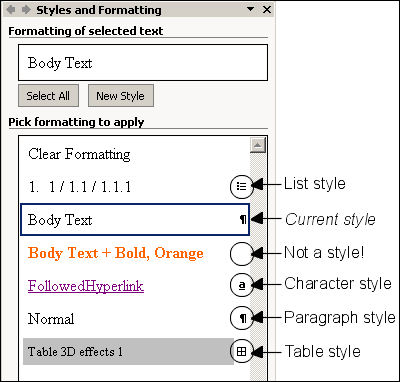
Figure 4: Word isn't creating new styles for you. But it might be listing formatting you have used in your document. Here, Body Text + Bold, Orange is a combination of a style (Body Text) and direct formatting (bold, orange) that you have, at some stage, used in this document.
When Word shows you the list of styles in the Styles and Formatting pane, you'll see an icon next to the name of each style. The icons show you what type of style it is (see Figure 4). In early versions of Word, there were two kinds of styles: paragraph styles and character styles. Word 2002 introduced two more: list styles and table styles.
Big idea 4: Word doesn't create new styles!
If, at Tools > Options > Edit, you tick the Keep Track of Formatting box, then in the Styles and Formatting task pane, you may see entries without a symbol. They're not styles! Entries without a symbol have names like 'Body Text + Bold' or 'Heading 1 + Orange'. These are combinations of a style and direct formatting that you have used in your document. Word has not created new styles in your document (see Figure 4).
What can I do with the Styles and Formatting pane?
You can use the Styles and Formatting pane to:
- apply a style to your text (for a paragraph style, click anywhere within the paragraph, then click the style name)
- see what styles and formatting you have ever used in this document (in the Show box, choose Formatting in Use or Styles in use)
- create a new style (click the New Style button near the top of the S&F pane)
- modify an existing style (hover over the style name, click the down arrow and choose Modify)
- delete a custom style (hover over the style name, click the down arrow and choose Delete – if it's greyed out, the style is built-in and you can't delete built-in styles)
- select all text formatted in a particular style, or with particular formatting (make sure that you have ticked the box at Tools > Options > Edit > Keep Track of Formatting; then click on a style name or formatting description and then click Select All near the top of the S&F pane)
- see how the style is formatted (the Styles and Formatting pane shows each style in its own formatting)
- see a description of the formatting for this style (hover over the style name) (See Figure 5)
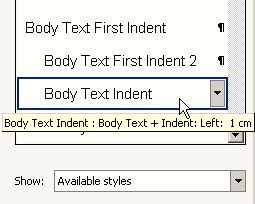
Figure 5: Hover your mouse over a style name to see how the style is defined.
- choose which styles you would like to see listed (in the Show box, choose Custom. In the Category box, choose All Styles. Now, tick and un-tick the list in the Styles to be Visible box. If you want to save this setting for all documents based on this document's template, click the Save settings in Template box. Click OK)
- make the S&F pane wider or narrower (hover over the dividing line until the cursor turns to a double-headed arrow, then drag).
How can I see and use the old Format Styles dialog box instead of the new Styles and Formatting pane?
If you don't like the Styles and Formatting pane, you can return to the old Format > Styles dialog that we've had since (at least) Word 95.
To get rid of the Styles and Formatting pane, you can customize the Format menu. Do Tools > Customize > Commands. Under Categories, click Format. On the right you have a list of all the formatting commands, many of which will be familiar because they're on the standard toolbars or menus.
On this list, you'll see an entry called "Styles and Formatting …" with two blue As as its icon. That's the one on your Format menu. Further down, you'll see another entry called "Styles …". Its icon is a black roman A and a blue italic A. Drag the one called "Styles…" to your Format menu. I put mine just above the existing "Styles and Formatting…" menu item.
Then, if you prefer using the keyboard to the mouse, you can change the shortcut keys. The customize dialog box is still open, right? Click on the Format menu, and right-click on the "Styles and Formatting…" item and remove the & from in front of the S in the name. Now, right-click on your new "Styles…" menu item, and insert an & in front of the S in its name.
Close the Customize dialog box.
You now have the new fandangled thing on your menu if you want it, but your old Format > Styles should look very familiar. This change must be saved to normal.dot to work next time you use Word, so if you're prompted to save it, say yes.
PS – Don't forget that the good old Styles box can always show you all your styles

Figure 6: To see all the styles in your document, hold down Shift, then click the arrow beside the Style box on the Formatting toolbar.
In Word 2002 and Word 2003, the Styles box is on the Formatting toolbar. When you click in a paragraph, the Styles box shows you the style of your paragraph.
In Word 2007, you can see the Styles box as a separate pane by doing ctrl-Shift-S. Or, on the Home tab, click the little arrow at the right of the buttons for each style. Then, choose Apply styles.
In both cases, the Styles box has a little drop-down list from which you can choose styles to apply to the selected text.
99 times out of 100, it won't show you all the styles in your document.
But… if you hold down Shift and click the down arrow, then bingo! you can see all your styles, and you can choose whatever you need (Figure 6).
Created November 2003. Last updated February 2007.


