


Front cover images in Microsoft Word report templates
What's the best way to create a front cover for a report with full-page image and text overlaying the image?
The requirements
I'm thinking of the typical business or government report. The report will have:
- a full-page image on the front cover, with text overlaying the image
- no footer and no page number on the cover
- page numbers, and possibly other text, in the footers of all other pages.
My aim in building the template is to make it as easy as possible for authors to produce a report. They should be able to concentrate on their content, not spend time mucking around with Word silliness.
So we want to make it easy for the author to add text to overlay a full-page image on the cover page.
The plain-vanilla solution
In lots of places you would read that the way to do this is to:
- use Different First Page headers and footers
- put the image in the first page header, and leave the (ordinary) header blank
- leave the first page footer blank and put the page numbers in the (ordinary) footer.
That plain-vanilla solution will work, if it's just you, and you have just one document to produce.
But in corporate work, building a template to be used by dozens or hundreds of people, that method is not robust.
The complications
Before we know how to format the cover, we need to think about landscape pages.
Why? Because sooner or later, the author of a report will want a landscape page, and to do that the user must insert a section break and make that section landscape.
The tricky issue is: what headers and footers will the first page of that landscape section have?
There are two typical problems:
- If the cover image is in the first page header, then by default the cover image will appear in the first page header when the user inserts a landscape section. Not good.
- If we omit page numbers from the first page footer in section 1, the first landscape page will not show page numbers. Also not good.
Therefore, we cannot rely on a single-section document with a Different First Page header or footer to hold the cover image and omit the page numbers.
The options
If we are to create a Word template for a report, with a front cover that has an image and no page numbers, then we have three options:
- Don't use a Different First Page header or footer. Put the image on the face of the first page and cover up the page numbers, perhaps with a white borderless box sitting on top of the page number.
- Insert a section break after the cover page. In section 1, put the cover image in the first page header, and leave the first page footer empty. In section 2, leave the header empty and put the page numbers in the footer.
- Let the poor users figure out how to unlink headers and footers on their own. Unacceptable! As a developer, I'm being paid to solve problems, not create them. Furthermore, businesses and government don't want to pay clever people to spend their time mucking around with cover images that appear on landscape pages for no apparent reason.
Option 1: Insert the image into the face of the document and cover up the page numbers
How Microsoft does it
In Word 2007 and Word 2010 we have an Insert > Cover Page button.
The new cover page feature is actually quite clever. There is much to be learned from how Microsoft has linked content controls to document properties so that I can change the cover page but retain my text.
All the built-in cover pages have a hard page break (yuck!) at the end of every cover page.
The cover pages use some floating tables, lots of floating text boxes and some images.
It's very easy for the user to delete any image, shape or text box.
It's very easy for the user to move an image, shape or text box or re-size it. And it's easy to change the column widths in tables.
Some built-in cover pages format text and graphic elements using theme colours. So the colours change if I change themes.
If I'm preparing a document for myself, those may be advantages. In a corporate environment, where you want consistency and ease of use, these are significant disadvantages.
Microsoft's cover pages are not typical of corporate report covers
The built-in cover pages are not typical of what I have to produce. The Cubicles cover sheet, for example, is quite smart. But:
- It almost bleeds on the left and the right. Few office printers can print that close to the edge of the paper, and so smart graphic designers won't design a report cover that bleeds.
- The 'cubicles' element is constructed from 9 individual shape elements, each of which can be individually moved, sized and formatted. Typically, I would get a front cover image from the graphic designer as one image, not as 9 bits of Leggo.
- The built-in cover pages don't address the page number issue.
How I'd do it
The big risk in placing graphic elements on the face of the document is that users can accidentally re-size, move or delete elements of the cover page. In a corporate world, where consistency is required and time is money, that's a risk we don't need.
If we place a full-page image on the front cover of a report, we can't eliminate that risk. But we can add both some prevention and some cure.
First, we can reduce (but not eliminate) the risk by doing two things.
- We can use in-line elements rather than floating text boxes, shapes, images and tables wherever possible.
- Where we must have floating elements, I'd lock their anchors to the first paragraph in the document.
These two steps won't prevent the user deleting or resizing graphic elements, but does make it difficult to drag the object out of position.
Second, we can allow a user to fix things easily if the user does accidentally delete the image or re-size a text box. The easiest way to do that is to save the content of your cover as a content control. Save it in the built-in Cover Pages gallery (and it will appear on the built-in Insert > Cover Page menu). Or, save it in the Custom Cover Pages gallery (which you can add to the ribbon as a custom control).
Be sure to populate your cover with content controls that are linked to document properties.
When the user accidentally makes a mess, the user can re-insert the cover page.
In a corporate report, page 2 will almost always start with a heading. That will often be a heading that says "Contents" or "Table of Contents". It can be formatted using the (new) built-in TOC Heading style. And the TOC Heading style can be modified with the Page Break Before setting. So we don't need a hard page break.
In most cases, there's no "nice" way to get rid of the page number on the front cover. One way or another, you have to cover it up. If you're lucky, one of your existing graphic elements will cover the page numbers. If not, you'll have to create a white, borderless shape. That's very inelegant. It is a maintenance nightmare (how will someone else know this is what you've done, when they can't see the box?). I don't like it. But if you want to put the image and any other graphical elements on the face of page 1, it may be the only way.
Option 2: Insert the image into a header or footer with a section break at the end of the cover page
In this option, a document has (at least) two sections:
- Section 1 has Different First Page set. The full-page image is in the first page header. And it has a blank first page footer.
Section 1 is only ever going to be 1 page long. So you could argue that you don't need Different First Page set, and you could put the image in the (ordinary) header.
But consider the user who accidentally presses Enter a few too many times on the front cover. When Word pops over on to page 2, I'd rather the user see a blank, white piece of paper than another page with the cover image in its header.
- On page 1 of the document, we use Content Controls to capture text and where possible link them to Document Properties. Depending on the design, it may be necessary to use a table to lay out the text. If so, put the table in-line, not floating.
- Section 2 generally does not have Different First Page set. It may have a header, if required (it seems to be very popular to put a small copy of logo in the top right hand corner of every page). Section 2 has a footer with the page number and any other required text.
The template: 1 section or 2?
If you use this method to create the cover page, you have two choices:
- Deploy the template with only one section. That section should be set up for the second and subsequent sections. It should include the page numbers, for example.
When the user creates a new document, the user can insert the cover page using Insert > Cover Page (if you've set up your cover page in the Cover Pages gallery) or a custom control you may create (if you saved the cover page in the Custom Cover Pages gallery).
This may be appropriate if the user must choose from several different cover pages, and none is particularly appropriate to choose as a default.
- Deploy the template with two sections: cover in section 1, lots of blank space ready to type in section 2.
My experience is that this is what users prefer. People generally prefer a 'shell' into which to type.
And since corporate reports don't just consist of a cover plus pages of text, my 'shell' is likely to include the cover, contents page, maybe a list of tables, maybe an automatically-created summary of recommendations, an indication of where to begin typing the content of the report, perhaps placeholders for appendixes, glossaries and other paraphernalia. But that is beyond the scope of this article!
Positioning a full-page cover image in the header
I like using an image that is the full size of the page. This cuts out all discussions about whether the image has been correctly re-sized and whether it is correctly positioned. I position the image in the header as follows:
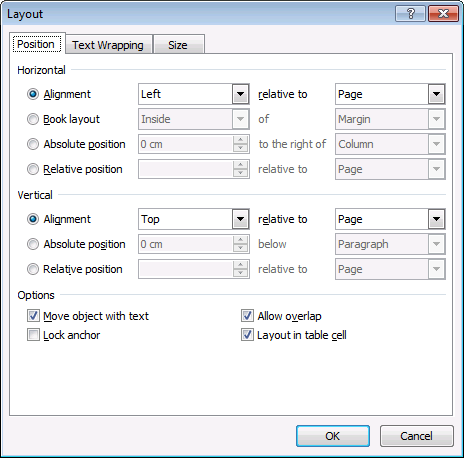
Figure 1: Position the image at the Left and Top relative to the Page
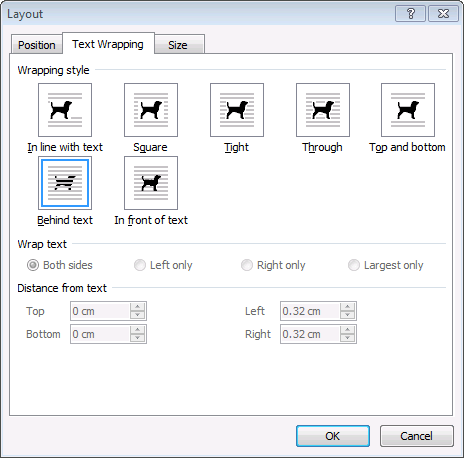
Figure 2: Set the image to be Behind the text
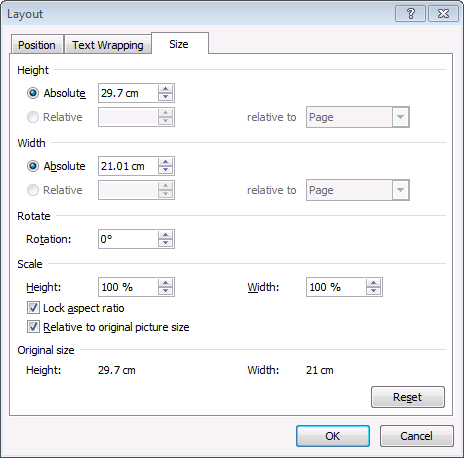
Figure 3: Assuming your nice graphic designer has provided an image that's just the right size, set the image to be 100% of the original size. For A4, that's 210mm x 297mm. (You can see at the bottom of this dialog box that the original image was 210mm x 297mm. But Word sometimes displays measurements with rounding errors: here the width is displayed, wrongly, as 21.01cm, where it should be 21cm.)
Disadvantages of this method
The biggest disadvantage of this method is that it is a little bit more difficult to set it up as a Cover Page Content Control. The Content Control must include the section break (for that is where the header and footer information is stored). But do not include the paragraph that follows the section break.
Tags: Content Controls, Headers and footers, Images, Page breaks, Page numbers, Pagination, Templates
Created 30 August 2010