How to create numbered headings or outline numbering in Word 2003 and earlier versions
How to number headings and outlines in Word:
1 Don't use Format > Paragraph and don't use Format > Bullets and Numbering. They look inviting, but they're not what you need.
 2 Don't use the toolbar numbering or bullet buttons. They're not what you need either.
3 Apply styles to your headings, preferably Word's built-in Heading styles.
4 Modify the styles so you can have the font, paragraph and other formatting to suit your needs.
5 Modify the numbering and indenting by modifying the numbering settings of the Heading styles. The styles will manage the numbering and the indents.
How you set up numbered headings depends on what version of Word you have. This page is about setting up numbered headings in Word 2003 and earlier versions. If you have Word 2007 or Word 2010, see How to create numbered headings or outline numbering in Word 2007 and Word 2010.
How to set up your Heading styles
The key to numbering heading is to use Styles. Since there are good reasons for using Word's built-in Heading styles, this page concentrates on using those Heading styles.
Before you begin the numbering, make sure your Heading styles are set up appropriately.
Modify the Heading 1 style so that it is based on "No style". Modify Heading 2 so it's based on Heading 1. Modify Heading 3 based on Heading 2. And so on. Not everyone does this, but I find it useful because of the way the formatting of Word's styles cascade.
Now, modify the Paragraph settings of every Heading style so that the Left Indent is 0, and the Special indent is set to (none). Do this even if you want your headings to be indented from the left margin, and even if you want a hanging indent. Why? Because for outline-numbered styles, we will set the paragraph indent and the hanging indents (if any) when we set up the numbering.
How to create your outline numbering
Put your cursor in a Heading 1 paragraph.
In Word 2002 and Word 2003, choose Format > Styles and Formatting. Right-click where it says "Heading 1", then choose Modify > Format > Numbering. (In earlier versions of Word, choose Format > Style > Modify > Format, and choose Numbering.)
Click the Outline Numbered Tab. Choose a pre-set numbering option that is similar to what you want. Choose this and promise yourself now that, no matter what, you will never choose any of the other options here. Always choose the box that is already highlighted.
Click Customize.
You're now in the Customize Outline Numbered List dialog. Within this dialog box, you have to define the numbering you want for all your numbering levels without leaving the dialog box. That means that within this dialog box, you have to define the numbering you want for all your heading styles. Only then can you leave the dialog box.
Reset the ListGallery before you start.
For a really clean professional job, go through each of the pre-set schemes on the Outline Numbered tab and click Reset. This will flush out any nasties left over from previous unsuccessful efforts to tame Word's numbering.
Then, choose one of the pre-set schemes in the second row. They are already set up to be linked to the Heading styles.
Set up the levels and link your styles
Within the Customize Outline Numbered List dialog, you can see the Levels numbered 1 to 9 down the left. Click Level 1.
Click More. Give your numbering scheme a name by typing something in the "ListNum Field List Name" box at the bottom of the dialog. One word, no spaces. Naming your list helps prevent subsequent errors.
Down the bottom of the dialog, Link Level 1 to style "Heading 1", link level 2 to style "Heading 2", link level 3 to style "Heading 3" and so on. There's no harm in doing all 9 levels, even if you don't intend to use all 9. It may even be a good idea.
Don't leave the Customize box yet!
Numbering for the first level
In the Level list, choose Level 1.
The Number format box shows you how your numbering will look. If you chose the first of the pre-set options, it will say 1). If you don't want the ), delete it. If you want your number to be followed by a period, add a . If you want a different numbering style (for example, roman numbers or letters), choose one from the Number style box. If you want a word to appear before the number (for example, "Section ", "Chapter " or "Part "), type the word before the number. (Note: If the Number Style box is greyed out, un-tick Legal Style Numbering at the bottom right of the dialog box.)
If you get completely confused, delete everything in the Number format box, and start again.
Don't leave the Customize box yet!
Numbering for all lower levels
For second and subsequent levels, indicate in the Previous Level Number box whether you want to include the number from the previous level.

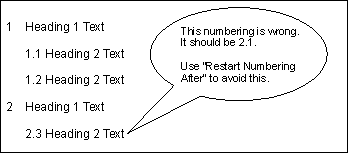
Figure 1: Use the Restart Numbering After setting to avoid numbering like this.
Tick the box that says Restart Numbering After, and ensure it's set to the correct level. So restart Level 2 after Level 1, for example. If you don't do this, your numbering will look like the text in Figure 1.
When you're just beginning, you can end up with wonderful messes in the Number format box. It doesn't help that this dialog box is not laid out in the most obviously intuitive way. If you end up in a mess, do the following.
- Delete everything in the Number format box.
- If you want text before the number (for example, "Chapter " or "Part "), type the text in the Number format box.
- If you want numbering from a previous level, choose that level.
- If you want punctuation between the previous level's number and the new number for this style, add it to the Number format box.
- Choose your style for this level's numbering from the Number Style box.
Don't leave the Customize box yet!
Controlling the indenting around numbers

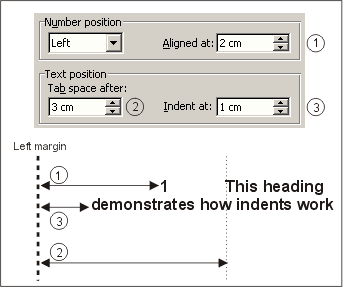
Figure 2: You can set the indents to control your numbering in the Customize Outline Numbered List dialog.
You also control the indents from the Customize Outline Numbered List. You can't control the indents by modifying the Paragraph format of the style. If you do, Word will simply override you.
The Number Position and Text Position parts of the dialog box control indents. How they work is shown in Figure 2.
I find it hard to decipher what the dialog box options mean (note that not all these options are available before Word 2002). My translations are:
- Number Position-Aligned at = How far in from the left margin do you want the number?
- Text Position-Tab Space After = How far in from the left margin do you want the text on the first line to start?
- If you set this to a number less than the Number Position-Aligned At setting, Word ignores your choice and improvises.
- If your number won't fit in the space you allocate (for example, "Section 12.3.9.4" won't fit in 1 cm), Word will push the text to the next tab stop.
- Text Position-Indent at = How far in from the left margin do you want the text on the second and subsequent lines to start? (If you want the text on the second and subsequent lines to start directly under the text on the first line, set this to equal the Tab Space After measure.)
So, set the Text Position and Number Position settings for each Level in your headings scheme.
Now, for each Level, indicate whether you want the number followed by a Tab, a Space or Nothing.
When you're happy that all levels are formatted as you want, click OK, OK, Apply.
Now you've defined the numbering for your headings, you are ready to go and apply the styles to your paragraphs. If you apply them and they're not formatted as you like, you can modify the styles.
How to maintain and modify your outline numbering
How to change the font or paragraph format of your headings
In the future, when you want to change anything about your heading levels, modify the style, not the individual paragraph. If you want Heading 2, for example, to be green and not bold, go to a Heading 2 paragraph and modify the style.
Note: You can't change the left indents of numbered styles by modifying the Paragraph settings of your style. (Well, you can, but your hard work will be overridden by Word at the drop of a hat.) To change the indents that control your numbering, read on.
How to change the indenting or numbering of your headings
If you want to change the numbering or the indentation of your headings, you must put your cursor in a Heading 1 style paragraph. Yes, even if you want to change the numbering or the indents of Heading 4 or Heading 7, you must start with your cursor in a Heading 1 paragraph.
With the cursor in a paragraph in Heading 1 style, choose Format > Styles and Formatting, right-click the style, choose Modify > Format > Numbering. (In versions of Word before 2002 it's Format > Style > Modify > Format > Numbering).
That's right: you control the indenting of numbered paragraphs by modifying the Numbering settings, not the Paragraph settings.
(And remember your promise to use the same pre-set position every time. If you don't, hell will rain upon you, your dog won't love you any more, and your numbering is likely to go ballistic.)
Related articles
How to create numbered headings or outline numbering in your Microsoft Word document


