How to copy a chart from Excel into a Word document
Unless you have good reasons to choose some other settings, the best way to copy a chart into Excel is to:
- choose Edit > Paste Special and choose to paste as Picture (Enhanced Metafile)
- double-click the chart and on the Layout tab, choose In line with text.
This page explains the ins and outs of copying an Excel chart into Word.
There are four things to think about:
- Do you want to link your chart to the source workbook?
- What format is best for your chart?
- How do you want text to flow around your chart?
- How do you control the size of text in the chart?
Do you want to link your chart to the source file?
You can paste a chart into Word and link it to its source file. If you do that, whenever you make a change in the source Excel file, Word can update the chart in your document to reflect the changes in the source Excel file.
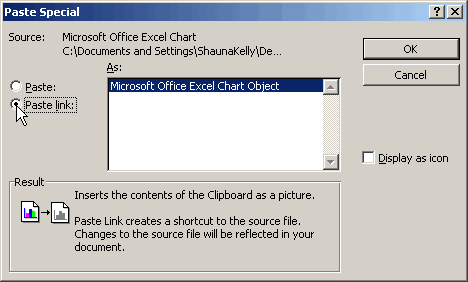
To link your chart to its source you need the Paste Special dialog. To see it:
- in Word 2003 and earlier versions, do Edit > Paste Special.
- in Word 2007 and later versions, on the Home tab, click the little arrow below the Paste button (it's called a split button; you need the bottom half), and choose Paste Special.
Within the Paste Special dialog, select the Paste Link option (Figure 2).

Figure 2: To link the chart in your Word document to its source Excel file, choose the Paste link option.
If you link your chart, when you double-click the chart in Word, Excel opens the original file, where you can edit it. When you return to Word, your Word document will reflect your changes.
What format is best for pasting a chart?
Your options for pasting depend on what version of Word you have, and whether you are linking the chart in Word to the source Excel data file. Here are the main options:
Paste as a picture
You can paste the chart as a picture. If you do this, the file size is small and you can treat it like a picture: re-size, rotate, convert to a drawing object so you can edit the text, and re-colour elements of the chart.
For most tasks, pasting as a picture is my preferred method.
To paste your Excel chart as a picture, follow one of these methods:
- In Excel, click the chart. In Word, choose Edit > Paste Special and choose to paste as a Picture (Enhanced Metafile).
- In Excel, click the chart once and be sure it shows 8 small black square markers on the edge. Do Edit > Copy, or just ctrl-c. In Word, do Edit > Paste, or just ctrl-v.
Paste as an Excel chart
Alternatively, you can paste the chart as an Excel chart. This imports the entire workbook into your Word document, so you can end up with a very large file. And, you risk disclosing the source data—and anything else that is in the Excel file—to the reader of your Word document.
To paste your Excel chart as an Excel chart object, follow one of these methods:
- In Excel, click the chart. In Word, choose Edit > Paste Special and choose to paste as an Microsoft Office Excel Chart Object.
- In Excel, hold down the Ctrl key and click the chart. Make sure it shows 8 hollow round markers on the edge. Do Edit > Copy, or just ctrl-c. In Word, do Edit > Paste, or just ctrl-v.
If your chart is in Word as an Excel chart, you can double-click the chart to edit the chart or anything else in the Excel file, including the source data for the chart. When you're finished, click outside the chart, in the main body of the Word document.
How do you want the text to flow around the chart? Should your chart be in-line or floating?
Your chart can sit in Word either in-line or floating. This controls the placement of your chart and how text flows around the chart.
If you want text over the chart, behind the chart, or to wrap around the chart, then your chart needs to float. Otherwise (that is, in most cases), your chart should be in-line. For more information, see Is your image slipping? How to get your images to stand still.
If you have a caption for your chart, and you want to make sure that the chart and the caption stay together, see How to keep a figure on the same page as its caption in Microsoft Word.
How to control the size of text in a chart
When you paste a chart into a Word document, you can re-size it to suit your needs. But if you do so, the size of text in the chart (the chart title, axis titles and tick marks, or the legend) can end up either too small or too large.
To solve this problem, make the chart in Excel about the same size as you want it to appear in Word. And adjust the size of text within the chart in Excel.
If you want a chart the full width of the page, set the paper size and margins in Excel to be the same as your Word document. Then, drag the edges of the Excel chart to size it.
In Excel, you can set a precise size for a chart. To do that:
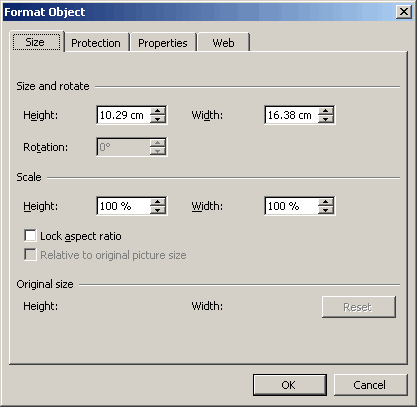
- In Excel 2002 or 2003 hold down the Ctrl key and double-click the chart. Or, hold down the Ctrl key and choose Format > Object. Either method will display the Format Object dialog (Figure 3) where you can set the size of the chart.
- In Excel 2007, click the chart, then on the Format contextual tab, enter the size you need.
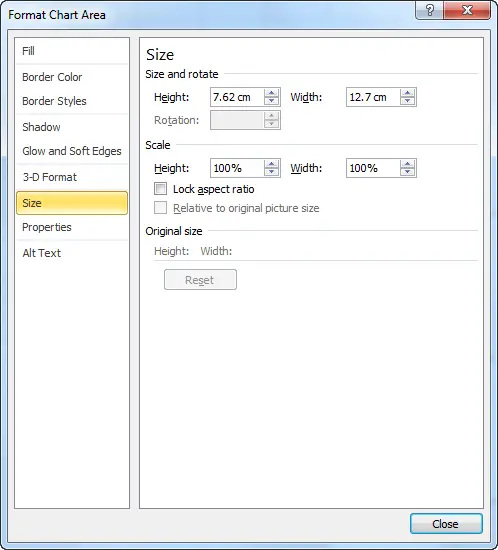
- In Excel 2010, hold down the Ctrl key and double-click the chart. That displays the Format Chart Area dialog (Figure 4). Choose Size on the left menu to display the Size pane where you can enter the size for your chart. Or, click the chart, then on the Format contextual tab, enter the size you need.

Figure 3: Excel 2003 Format Object dialog (Excel 2002 looks similar). You can use Excel's Format Object dialog box to set the size of your Excel chart precisely. When you paste it into Word, it will retain roughly the same size.

Figure 4: Excel 2010 Format Chart Area dialog (Excel 2007 looks similar). Click Size in the left hand menu to see the Size pane, where you can set the size of your Excel chart precisely. When you paste it into Word, it will retain roughly the same size.


