


How does Track Changes in Microsoft Word work?
If you are using a newer version of Word:
For an updated article that covers Word 2013, Word 2016, Word 2019, Word 2021, and Word for Microsoft 365, see Lene Fredborg's article
Track Changes in Word – how it works
There are four steps to tracking changes:
- Tell Word to track changes.
- Tell Word to display Tracked Changes.
- Tell Word how to display Tracked Changes.
- Tell Word to accept or reject the changes.
Contents of this page
What is track changes, and why would I want to use it?
How to turn track changes on and off
How to display the tracked changes
How to hide (but not delete) track changes
Working with more than one author or reviewer: Who did what?
Security issues with tracking changes
What is track changes, and why would I want to use it?
Q: What is Track Changes?
Track Changes is a way for Microsoft Word to keep track of the changes you make to a document. You can then choose to accept or reject those changes.
Let's say Bill creates a document and emails it to his colleague, Lee, for feedback. Lee can edit the document with Track Changes on. When Lee sends the document back to Bill, Bill can see what changes Lee had made.
Track Changes is also known as redline, or redlining. This is because some industries traditionally draw a vertical red line in the margin to show that some text has changed.
Q: What do I need to know to use Track Changes?
To use Track Changes, you need to know that there are three entirely separate things that might be going on at any one time:
- First, at some time in the past (last week, yesterday, one millisecond ago), Word might have kept track of the changes you made. It did this because you turned on Track Changes. Word then remembered the changes you made to your document, and stored the changes in your document.
- Second, if Word has stored information about changes you've made to your document, then you can choose to display those changes, or to hide them. Hiding them doesn't make them go away. It just hides them from view. (The only way to remove the tracked changes from your document is to accept or reject them.)
- Third, at this very moment in time, Word may be tracking the changes you make to your document.
Just to make the point:
- Word may, or may not, be currently keeping track of the changes you make.
- At the same time, Word may, or may not, have stored changes you made to the document at some point in the past.
- And, at the same time, Word may, or may not, be displaying those tracked changes. Turning off (ie, hiding) the tracked changes doesn't remove them. It just hides them. To remove the tracked changes from the document, you must accept or reject them
How to turn track changes on and off
Q: How do I tell Word to track the changes I make to my document?
To turn on Track Changes (that is, to tell Word to track each change you make in your document), do one of the following:
- In all versions of Word: Ctrl+Shift+e
- In Word 2007 and Word 2010: on the status bar, click "Track Changes: Off" to turn on track changes. If you can't see "Track Changes" on the status bar then right-click the status bar and click Track Changes.
- In Word 2007 and Word 2010: Review > Track Changes. When the button is highlighted, Word is tracking changes.
- In Word 2003 and earlier versions: Double-click the TRK text in the status bar at the bottom of the screen. If TRK is black, Word is tracking changes.
- In Word 2002 and 2003: Tools > Track Changes.
- In Word 2000 and earlier versions: Tools > Track Changes > Highlight Changes. Tick Track Changes while editing.
Q: How can I tell if Word is tracking changes in my document?
Look at the Status Bar at the bottom of the screen. In Word 2003 and earlier versions: look for "TRK". If it's black, Word is tracking changes. If it's dimmed, Word is not tracking changes. In Word 2007 and Word 2010, look for "Track Changes: On" or "Track Changes: Off". If you can't see "Track Changes" on the status bar, then right-click the status bar and click Track Changes.
But… turning Track Changes on or off doesn't affect whether you can see the tracked changes. So read on…
How to display the tracked changes
Q: I want to see the tracked changes in my document. How do I turn on the display of tracked changes?
There are several ways to do this, depending on what you need:
- In Word 2007 and Word 2010, on the Review tab, use the little menus in the Tracking group. Final: Show Markup or Original: Show Markup will show what changes you have made. But check the selected items on the Show Markup menu to be sure that Word is showing you the right things.
- In Word 2002 and 2003, on the Reviewing toolbar, choose Final with Markup or Original with Markup. This will show you what changes have been made. If you are using balloons to display track changes (there's information about balloons, below), then:
- Original Showing Markup displays insertions in balloons.
- Final Showing Markup displays deletions in balloons.
- In Word 2000 and earlier, Tools > Track Changes > Highlight Changes. Tick Highlight Changes on Screen.
Q: How do I control how Word displays tracked changes?
Word 2003 and earlier versions
Do Tools > Options. Click the Track Changes tab. Here you choose how to display tracked changes when you are displaying tracked changes.
To learn more about how Word displays tracked changes in Word 2002 and Word 2003, see How to use the Reviewing Toolbar in Microsoft Word 2002 and Word 2003.
[Just to recap: Turn on the display of tracked changes by choosing Final with Markup or Original with Markup. Having turned on the display, tell Word how to display the tracked changes using Tools > Options > Tracked Changes.]
Word 2007 and Word 2010
In Word 2007 and Word 2010, on the Review tab, click the bottom half of the big Track Changes split button and choose Change Tracking Options. (In my view, this menu item is mis-named. The options are not about the tracking. They are about how to display the effects of the tracking. It's a subtle difference, but it's got a lot of people into hot water over the years!)
[Just to recap: Turn on the display of tracked changes by choosing Final: Show Markup or Original: Show Markup. Refine the choice of what to show using the Show Markup menu. Having turned on the display, tell Word how to display the tracked changes using Review > Track Changes > Change Tracking Options.]
How to hide (but not delete) tracked changes
Don't accidentally distribute documents containing tracked changes!
In Word 2002 and 2003, Tools > Options. On the Security tab, make sure you have ticked two important boxes.
- Tick the "Warn before printing, saving or sending a file that contains tracked changes or comments" box.
- Tick the "Make hidden markup visible when opening or saving" box.
In Word 2007: File > Word Options. In Word 2010: File > Options. In both Word 2007 and Word 2010: From the Word Options dialog, click Trust Center, then Trust Center settings. In the Trust Center dialog box click Privacy Options. And now, exhausted from your long trip through the labyrinth of dialog boxes, tick the "Warn before printing, saving or sending a file that contains tracked changes or comments"
Turning these off is akin to removing the battery from the smoke alarm in your house.
Q: I want to hide the tracked changes in my document. How do I turn off the display of tracked changes?
There are several ways to do this, depending on what you need:
- In Word 2007 and Word 2010, on the Review tab, in the Tracking group, choose Final. This displays your document as if you had accepted all the tracked changes in the document. It hides (but does not remove) the tracked changes.
- In Word 2007 and 2010, on the Review tab, in the Tracking group, choose Original. This displays your document as if you had rejected all the tracked changes in the document. It hides (but does not remove) the tracked changes.
- In Word 2002 and 2003, on the Reviewing toolbar, choose Final. This displays your document as if you had accepted all the tracked changes in the document. It hides (but does not remove) the tracked changes.
- In Word 2002 and 2003, on the Reviewing toolbar, choose Original. This displays your document as if you had rejected all the tracked changes in the document. It hides (but does not remove) the tracked changes.
- In earlier versions of Word, Tools > Track Changes > Highlight Changes. Un-tick Highlight Changes on Screen. This displays your document as if you had accepted all the tracked changes. It hides (but does not remove) the tracked changes.
But… if you turn off the display of tracked changes, it doesn't mean they're not there. The tracked changes are just hidden. Anyone could open your document and choose to view your tracked changes. To remove the tracked changes from your document, read on…
How to remove tracked changes
Q: How do I delete tracked changes from my document?
To delelete a tracked change, either accept it or reject it.
Q: How do I accept or reject one tracked change?
- In any version of Word, right-click on the tracked change and choose Accept Insertion or Reject Deletion or Accept Change or Reject Format Change etc.
The menu you see when you right-click text depends on the context. Generally (though not always) if you right-click on a tracked change that Word deems to be a spelling error, you'll get the menu appropriate to spelling errors, not the menu appropriate to tracked changes. If that's the case, use the menus or the ribbon to accept or reject the tracked change.
- In Word 2007 and Word 2010, to accept or reject one tracked change, click within the change and on the Review tab, click Accept or Reject.
- To accept one tracked change in Word 2002 or Word 2003, click within the change and then on the Reviewing toolbar, click the Accept Change button (it's the one with the blue tick). To reject (ie delete) one tracked change in Word 2002 or Word 2003, on the Reviewing toolbar, click the Reject Change button (it's the one with the red cross).
- In Word 2000 and earlier, Tools > Track Changes > Accept or Reject Changes. Click one of the Find buttons (with the green arrow) to go through the changes one by one. Accept or reject the change.
Turn on track changes before making any big changes to your document
If you're about to make a really big change to your document, turn on track changes and then make the change.
If you don't like the result of your change, you will be able to reject the changes easily.
For example, AppScout [Lene Fredborg, 14-Jun-2020: Removed outdated link] suggests turning on track changes before a global search and replace of HTML tags.
Q: How do I accept or reject all tracked changes in the document in one step?
Word 2007 and Word 2010
To accept all changes in the document, on the Review tab, click the bottom half of the Accept button and choose Accept All Changes in Document.
To reject all the changes in the document, on the Review tab, click the bottom half of the Reject button and choose Reject All Changes in Document.
Word 2002 and Word 2003
To accept all changes in Word 2002 or Word 2003: on the Reviewing toolbar, hover over the Accept Change button (the one with the blue tick). Click on the arrow you see to the right of the button. Choose Accept all Changes in Document.
To reject (or delete) all changes in Word 2002 or Word 2003: on the Reviewing toolbar, hover over the Reject Change button (the one with the red cross). Click on the arrow you see to the right of the button. Choose Reject all Changes in Document.
- Note: If you have Word 2002 or 2003, and you liked the old Accept or Reject changes box from earlier versions, you can reinstate it. A sensible place to put this button is on the Reviewing toolbar. Tools > Customize. Click the Toolbars tab. Make sure that Reviewing is ticked. Now, click the Commands tab. In the Categories list, choose All Commands. In the Commands list, find ToolsReviewRevisions. Drag it to the Reviewing toolbar. Click Close to close the Customize dialog. There will now be a new button on the Reviewing toolbar called Accept or Reject Changes. If you're later prompted to save Normal.dot, say yes.
Word 2000 and earlier
In Word 2000 and earlier, Tools > Track Changes > Accept or Reject Changes. You can choose to accept or reject all the changes in the document.
Printing tracked changes
Q: How do I print out my document showing the tracked changes?
Word 2002 and before: Tools > Track Changes > Highlight Changes. Tick Highlight Changes in Printed Document.
Word 2002 and 2003: File > Print. In the "Print What" box, choose Document showing Markup.
Word 2007: Round Office button > Print. In the "Print What" box, choose "Document showing markup".
Word 2010: File > Print. Under Settings, click the first button (that probably says 'Print All Pages'). On the subsequent menu, choose 'Print Markup'. See Figure 1.
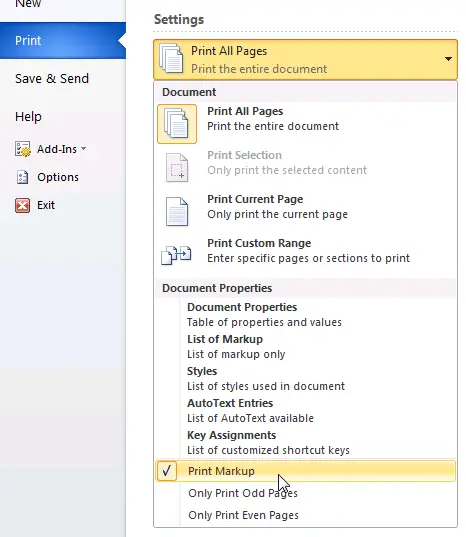
Figure 1. In Word 2010, print markup using the Print menu. Click the first button under 'Settings' (which probably says Print All Pages). On the menu, tick Print Markup.
Q: How do I print out my document without showing the tracked changes?
Word 2002 and before: Tools > Track Changes > Highlight Changes. Un-tick Highlight Changes in Printed Document
Word 2002 and 2003: File > Print. In the "Print What" box, choose Document.
Word 2007: Round Office button > Print. In the "Print What" box, choose Document.
Word 2010: File > Print. Under Settings, click the first button (that probably says 'Print All Pages'). On the subsequent menu, un-tick Print Markup. See Figure 1.
Q: How do I print a list of the tracked changes in my document?
Word 2000 and earlier: This functionality is not available in Word 2000 or earlier versions. But you can print just the comments. File > Print. In the "Print What" box, choose Comments.
Word 2002 and 2003: File > Print. In the "Print What" box, choose List of Markup.
Word 2007: Round Office button > Print. In the "Print What" box, choose List of Markup.
Word 2010: File > Print. Under Settings, click the first button (that probably says 'Print All Pages'). On the subsequent menu, tick List of Markup.
TIP: The free Word add-in DocTools ExtractData lets you automatically export all insertions and deletions in a document to a new document. The exported data is set up in a table. For each insertion and deletion, you will find the page number, line number, type of change, the revised text, author name and revision date. The advanced Word add-in DocTools ExtractChanges Pro lets you export insertions, deletions and comments in full context, including headings and subheadings. In addition, the add-in includes several other features. For detailed information about comments, see the article How comments in Word work.
Working with more than one author or reviewer: Who did what?
Terminology trap!
Once upon a time, Microsoft invented "Track Changes". "Authors" put "changes" into their documents.
More recently, "Reviewers" make "revisions" to their documents. And "revisions" are one kind of "markup".
In Word 2002 and later versions, you display the work of a "Reviewer", but you may do so by choosing the colour "By Author".
You can accept or reject a "Change", show a list of "Revisions" in the Reviewing pane, but print a list of "Markup". And they're all the same thing.
Q: How do I see which changes were made by which author (also known as a reviewer)?
If several authors have reviewed the document while Track Changes was on, then you can identify the author (or reviewer) in several ways:
- In any version of Word, hover the mouse over the tracked change. A balloon will appear that shows you the name of the author.
- In Word 2002 or later versions, if you are using balloons to display tracked changes, hover the mouse over the balloon.
- In Word 2002 and Word 2003, on the Reviewing toolbar, click the Reviewing Pane button. You can now see a pane at the bottom of the screen that identifies the author of each change.
- In Word 2007 and Word 2010, on the Review tab, click the Reviewing Pane button. This displays a pane at the left of the screen that identifies the author of each change. Or, click the little arrow beside the Reviewing Pane button to choose to display the Reviewing Pane at the bottom of the screen.
Q: How do I display each author's changes in a different colour?
In Word 2003 and earlier versions: Tools > Options. Click the Track Changes tab. In any of the Color boxes, choose "By Author".
In Word 2007 and Word 2010: on the Review tab, click the bottom half of the Track Changes button and choose Change Tracking Options. In the Track Changes Options dialog, in any of the color boxes, choose "By author".
Q: How does Word choose which colour to allocate to which author?
You can choose to display tracked changed in any of 16 colours. But if you want Word to display different reviewers' revisions in different colours (that is, if you choose to display using the "By Author" color), then Word only provides 8 colours with which to distinguish authors.
In theory, Word allocates colours to reviewers in the following order: red, blue, green, violet, dark red, teal, dark yellow and grey. For the 9th and subsequent reviewers of a document, Word cycles through the colours again. But in practice, as reviewers come and go (as their revisions are accepted or rejected), the allocation of colours to reviewers ends up, in effect, random.
You can test this out by changing the user's name, turning on tracked changes and making some changes to your document. To change the user's name, in Word 2003 and before use Tools > Options > User Information. In Word 2007 and Word 2010, on the Review tab, click the bottom half of the Track Changes button and choose Change User Name.
Q: Can I allocate a specific colour to each author?
No. Word allocates colours to authors (who are also called reviewers).
Q: If Fred's revisions are shown in red on my machine, will they also be red on someone else's machine?
Maybe, maybe not. Don't rely on any one author's revisions being displayed in a particular colour from day to day, or from machine to machine. Word likes to be creative, and you can't control its creative urges!
Q: Where does Word get the author's name from?
Word attributes a tracked change to the name of the author specified at Tools > Options > User Information (in Word 2003 and earlier) or Review > Track Changes > Change User Name (in Word 2007 and Word 2010).
Q: How do I display only the changes (or revisions) made by one author (or reviewer)?
In Word 2007 or Word 2010, on the Review tab, in th Show Markup menu, choose Reviewers, and then tick or un-tick names to choose the reviewers whose changes you want to see.
In Word 2002 or 2003, on the Reviewing toolbar, Show > Reviewers, and tick or un-tick names to choose the reviewers whose changes you want to see.
There is no equivalent functionality in earlier versions of Word.
Security issues with tracking changes
Q: I've heard that using track changes is a security threat. Is that right?
Well… yes and no. Electricity is powerful, and dangerous. Just don't go sticking your finger in the power outlet. Using Track Changes is powerful, and dangerous. Just don't email or publish documents containing tracked changes you wouldn't want the world to see.
Unfortunately lots of people have made this mistake. Don't be like one of these people.
A reasonably balanced overview of security issues and track changes by Donna Payne was published by law.com in August 2006.
Q: How can I tell if there are Tracked Changes in my document?
- In Word 2000 and earlier, Tools > Track Changes > Accept or Reject Changes. Click one of the Find buttons (with the green arrow). If it doesn't find anything, there's nothing to find.1
- In Word 2002 and Word 2003, on the Reviewing toolbar, click the Next button (it's the one with the blue arrow). If the message box says "The document contains no comments or tracked changes", then there are no comments or tracked changes. Otherwise, the insertion point will move to the first tracked change in the document.
- In Word 2007 and Word 2010, on the Review tab, click the Next button. If the message says "The document contains no comments or tracked changes" then there are no comments or tracked changes. Otherwise, the insertion point will move to the first tracked change in the document.
- Word 2007 and Word 2010 also have a Document Inspector.
- To inspect a document:
- In Word 2007: Round Office button > Prepare > Inspect Document > Inspect.
-
In Word 2010: File > Info > Check for Issues > Inspect Document > Inspect.
-
You'll get a report of your document that will tell you about revisions (aka tracked changes). If there are tracked changes in the document, Word will give you a Remove All button.
This is a bit ruthless for my taste. It seems to me that the only reason you would use the Document Inspector to look for tracked changes is if you don't know what tracked changes are in the document. And if I don't know what's there, I don't want to click a button that will delete the lot in one fell swoop. It doesn't even tell me if "remove" means "accept" or "reject". (It means "accept".)
If I do know what tracked changes are in the document, then the tools on the Review tab give me more information and more options than the Document Inspector.
I'm an absolute fanatic about security and privacy. But the Document Inspector does sometimes report messages akin to "Warning! You have windows in your house! Remove all?".
- To inspect a document:
Q: How can I make sure that Word always displays tracked changes when I open a document.
Word 2007 and Word 2010: In Word 2007 start with the round Office button > Word Options. In Word 2010 start with File > Options. In both versions, from the Word Options dialog, choose Trust Centre > Trust Centre Settings > Privacy Options. In the "Document-specific settings" section, tick the box "Make hidden markup visible when opening or saving".
In Word 2003, Tools > Options > Security. Tick "Make hidden markup visible when opening or saving."
This functionality isn't available in earlier versions of Word.
Q: Can Word warn me before I email a document containing tracked changes?
Word 2007 and Word 2010: In Word 2007 start with the round Office button > Word Options. In Word 2010 start with File > Options. In both versions, from the Word Options dialog, choose Trust Centre > Trust Centre Settings > Privacy Options. In the "Document-specific settings" section, tick the box "Warn before printing, saving or sending a file that contains tracked changes or comments".
In Word 2003 and Word 2002, Tools > Options > Security. Tick "Warn before printing, saving or sending a file that contains tracked changes or comments".
This functionality isn't available in earlier versions of Word.
Q: I want to send my document outside the company. I want to leave tracked changes in the document, but I don't want anyone to see who made the tracked changes or when they were made. How do I do that?
Word 2002 and earlier
In Word 2002 and earlier, you can't. The author (or reviewer) information and the date information are permanently attached to the revision when the revision was tracked. You can't change them, even in macro code.
Word 2003
In Word 2003, Tools > Options > Security. Tick the box "Remove personal information from file properties on save." In spite of the name, this does more than just remove information in the file properties. If this box is ticked, Word removes the name of the author of a tracked change, and it removes the date and time that the change was made when you save your document. But it leaves the tracked change itself. All tracked changes and comments will be now attributed to an anonymous "Author".
In Word 2007 and Word 2010
For one document at a time, you can remove the personal information about tracked changes. To do that:
- In Word 2007: Round Office button > Prepare > Inspect Document > Inspect.
- In Wor 2010: File > Info > Check for Issues > Inspect Document > Inspect.
After the Inspector does its thing, you will see several 'Remove All' buttons.
- The Remove All button for Comments, Revisions etc removes comments and accepts all tracked changes.
- The Remove All button for Document Properties and Personal Information just assigns the name "Author" to your tracked changes, and removes the date and time the tracked change. This is the one you need if you want to retain the tracked changes, but remove the author's name and the date and time the tracked change was made.
The Remove All button for Document Properties and Personal Information sets the 'Remove personal information from file properties on save' option for the document. So next time you save, your name will again be removed from tracked changes. If you don't want that, then:
- Iin Word 2010 do File > Info. In the 'Prepare for Sharing' section you will now see a note telling you that personal information will be removed on save. Click 'Allow this information to be saved in your file' to turn the setting off.
- In Word 2007 and Word 2010 you can turn off this option in the Privacy Settings in the Trust Center. The option is greyed out and disabled unless (a) you have a document created in an earlier version of Word that used this setting or (b) you run the Document Inspector from the File (or Office Button) menu and choose to remove Document Properties and Personal Information.
Q: How can I be absolutely sure that there is no tracked changes information left in my document?
[NOTE: outdated links in this paragraph removed by Lene Fredborg 12-Jul-2016] One way to do this is to use Microsoft's Remove Hidden Data Tool. You can download the Office 2003/XP Add-in: Remove Hidden Data tool . However, be aware of the Known issues with the Remove Hidden Data tool.
The Hidden Data Tool morphed into the built-in Document Inspector in Word 2007 and Word 2010. To inspect a document:
- In Word 2007: Round Office button > Prepare > Inspect Document > Inspect.
-
In Word 2070: File > Info > Check for Issues > Inspect Document > Inspect.
What other kinds of information might be saved in my document?
Your documents might contain various kinds of hidden information that could compromise your security. Microsoft uses the term "metadata" (that is, data about the data) to refer to this kind of information. Here are links to information about how to minimize metadata in your documents:
Word 97: Microsoft knowledge base article 223790 [Lene Fredborg, 18-Apr-2025: Removed outdated link to Microsoft knowledge base article]
Word 2000: Microsoft knowledge base article 237361 [Lene Fredborg, 18-Apr-2025: Removed outdated link to Microsoft knowledge base article]
Word 2002: Microsoft knowledge base article 290945 [Lene Fredborg, 18-Apr-2025: Removed outdated link to Microsoft knowledge base article]
Word 2003: Microsoft knowledge base article 825576 [Lene Fredborg, 18-Apr-2025: Removed outdated link to Microsoft knowledge base article]
Word 2007: Remove hidden data and personal information from Office documents
Word 2010: Remove hidden data and personal information by inspecting documents
How to copy text containing tracked changes
Q: How do I copy text to another document without copying the track changes?
In the donor document, turn on Track Changes. (In Word 2003 and earlier, ensure that TRK on the status bar is dark. In Word 2007 and Word 2010, ensure that the status bar says "Track Changes: On".)
In the recipient document, turn off Track Changes. (In Word 2003 and earlier, ensure that TRK on the status bar is dimmed. In Word 2007 and Word 2010, ensure that the status bar says "Track Changes: Off".)
Now copy and paste.
Q: How do I copy text to another document with the tracked changes?
In the donor document, turn off Track Changes. (In Word 2003 and earlier, ensure that TRK on the status bar is dimmed. In Word 2007 and Word 2010, ensure that the status bar says "Track Changes: Off".)
In the recipient document, turn off Track Changes. (In Word 2003 and earlier, ensure that TRK on the status bar is dimmed. In Word 2007 and Word 2010, ensure that the status bar says "Track Changes: Off".)
Now copy and paste.
However, Clare discovered that if you have a table containing tracked changes, and you select only the table, then the tracked changes won't copy into the new document.
The workaround is to select a paragraph before or after the table as well as the table itself. Make sure Track Changes is turned off, and then copy. Now, the tracked changes will copy along with the text.
Other issues with track changes
Q: When I use Tracked Changes the numbering of my captions gets mixed up. Caption numbering seems to skip some numbers. How do I stop that?
If track changes is on, and you delete a figure caption, Word marks the caption for deletion. It waits for you to accept or reject that change before it really deletes the text from your document. So while track changes is on, the numbering appears to be wrong. When you think about it, Word is doing exactly what you would want. When you accept or reject all the changes, do ctrl-a then press F9. That will update all fields in the document and the caption numbers will be fixed.
If you are using a newer version of Word:
For an updated article that covers Word 2013, Word 2016, Word 2019, and Word for Microsoft 365, see Lene Fredborg's article
Track Changes in Word – how it works
Acknowledgment
Thanks to Microsoft Office MVP Beth Melton for reminding me about some of the security features of Word 2003 and to several readers who pointed out typos in the page.
1. Yes, Geoff. I know you can't prove the null hypothesis. Gimme a break!