5. Use a bulleted paragraph style for bullets and dotpoints
What this page is about
For those of you who have just joined us, this is a page in the series of Basic Concepts in Word.Use the menu at left to go to the different pages.
Each Basic Concept page has three sections:
- A how-to Tutorial
- Reference section
- Curiosity Shop for the inquisitive.
Tutorial
This page is about using bullets or dotpoints in your document. We're working through a sample document.
This page is about multi-level bullets, the kind where lower levels of bullets are indented. If you just need a simple bullet format, with no indenting, see How to control bullets on this site.
The next piece of text we want to add to the document is this:
There are three kinds of lazy dogs:
- dogs that like to sleep all day
- dogs that just don't mind foxes jumping over them
- dogs that have workked hard all day and are now resting.
Obviously the introductory line ("There are three kinds …") is in Body Text style. But how to do the bullets? For the moment, just type the text. Don't worry about the bullets. Don't worry about the fact that we want them indented from the left margin. So your documentlooks like the following (remember the ¶ sign on the screen shows where you pressed Enterto end a paragraph).
There are three kinds of lazy dogs:
dogs that like to sleep all day
dogs that just don't mind foxes jumping over them
dogs that have workked hard all day and are now resting.
How not to add bullets to your text
- Some users of Word will create bullets using the bullet button on the toolbar. It works, more or less. But it doesn't give you much control over what's going on, it's not stable, and copying from document to document is, let's say, interesting. Not for grown ups.
- Some users of Word will use Format > Bullets and Numbering. It works, kind of, on Tuesdays, if there's a full moon, if Collingwood beat Carlton last week. It gives you more options to play with than the bullets button, but all that does is complicate matters. Also not for grown ups. Not even Carlton supporters<g>.
How to add bullets to your list
The grown-up way to create bullets is to use a bulleted Style.One easy way to do that is to click on the Style box and select List Bullet. But first you need to tell Word to show you the List Bullet style in the list of styles.
Step 1: Make sure you can see the List Bullet style
To tell Word to show you the List Bullet style in the list of styles, do the following.
For users of Word 2002: On the Format menu, choose Styles and Formatting. The Styles and Formattingtask pane will pop up. Down the bottom, in the Show box, choose "All Styles".
For users of Word before 2002: On the Format menu, chooseStyle. The Style dialog box will pop up. In the Category box, choose "All Styles".
Step 2: Apply the List Bullet style

Figure 1: Locate the Style box on the Formatting toolbar. Click the arrow and choose the List Bullet style.
Click in the first paragraph that you want bulleted. From the Style box on the toolbar (Figure 1), select List Bullet. That will give you a bullet at the beginning of the paragraph.
You have two more paragraphs to format. You can select both at once, and apply the List Bullet style to both at once. To do that, click anywhere in one paragraph. Hold down Shift. Click anywhere in the other paragraph. Now, use the Style box and choose List Bullet.
You'll see something like the following:
There are three kinds of lazy dogs:
- dogs that like to sleep all day
- dogs that just don't mind being jumped over
- dogs that have workked hard all day and are now resting.
Your List Bullet style probably has your bulleted paragraphs flush against the left margin. But we want them indented by, say, 1.5cm. (I can't cope with the old British Imperial measurement system, so the Americans among you will have to translate into inches. It's very roughly an inch.)
Step 3: Modify the List Bullet style
So, we need to modify the List Bullet style to change the left indent. How to do that? First, make sure the Insertion Point is in one of your List Bullet paragraphs.
In Word 2002, Format > Styles and Formatting. Down the bottom of the pane on the right, set Show to be "All Styles". Now, find List Bulletin the list of styles. Right-click List Bullet and choose Modify. (For older versions of Word, Format > Styles. Click Modify.)
Step 3.1: The Modify Style dialog box

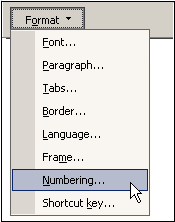
Figure 2: In the Modify Style dialog box, click Format, then Numbering.
We're now in the Modify Style dialog. Click Format, then Numbering (Figure 2). Yes: Numbering. Common sense says that modifying a left indent has nothing to do with numbering. It seems like the left indents should be controlled from the Paragraph settings.True. In my view, it's a bug.
It might also seem odd to have to click Numbering when you want to deal with bullets. But Word thinks they're much the same thing. So click Numbering.
Step 3.2: The Bullets and Numbering dialog box

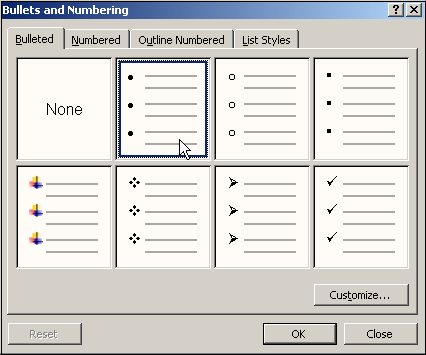
Figure 3: In the Bullets and Numbering dialog box, one scheme may already be highlighted. Always choose the highlighted scheme, then click Customize. This picture is from Word 2002. Your dialog box may look different if you have an earlier version of Word, or if you havecustomized any of the schemes.
You're now at the Bullets and Numbering dialog box. Click the Bulleted tab. You will see 8 schemes for bulleting (Figure 3).
- If one scheme is highlighted, perhaps with a blue border, choose it. No matter how tempting the other ones look, click the highlighted one and then click Customize.
- If none of the 8 schemes is highlighted, choose the one that looks most like what you want to achieve, and click it. Then, clickCustomize. And … promise yourself now that, if you have to come back to this dialog box, you will always choose the highlighted scheme.
Step 3.3: The Customize Bulleted List dialog box
In this dialog box, you can have a bit of fun. For example, you could click the Font button to make the bullets red. More usefully, you set the indents here.
This dialog box wins my award for inscrutable communication of the decade! It's about as intuitive as jumping out of a 747 without a parachute. The dialog box has changed a bit over the years (and in the process become even more inscrutable) so I'll show you two versions of it.
Modifying indents for bullets in Word 2002
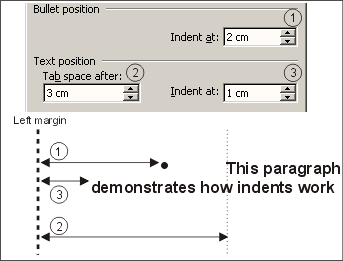
In Word 2002, line up your bullets using these rules (Figure 4):

Figure 4: How to set indents for bullets in Word 2002 in the Customize Bulleted List dialog box. In this example, if you want"demonstrates" to line up under "This paragraph", use 2cm, 3cm, 3cm.
- Bullet Position = How far in from the left margin do you want the bullet?
- Text Position-Tab Space After = How far in from the left margin do you want the text on the first line to start?
If you set this to a number less than the Bullet Position setting, Word ignores your choice and improvises. If your number won't fit in the space you allocate (for example, a big bullet won't fit in 0.2 cm), Word will push the text to the next tab stop.
- Text Position-Indent at = How far in from the left margin do you want the text on the second and subsequent lines to start? (If you want the text on the second and subsequent lines to start directly under the text on the first line, set this to equal the Tab Space After measure.)
In the example we're creating above, appropriate settings would be 1.5cm, 3cm, 3cm (or in the British Imperial measurement system, perhaps 1", 2", 2").
Word 2002 Tip: Once you have set the indents for your bullets this way, don't change the tabs or paragraph indents for paragraphs in your bulleted style, or you will ruin your good work and have to start again.
Modifying indents for bullets in earlier versions of Word

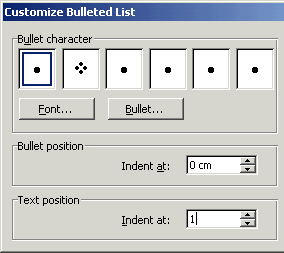
Figure 5: How to set indents for bullets in Word 95, 97 and 2000 in the Customize Bulleted List dialog box. In this example, the bullets arelined up against the left margin, and the text is 1cm from the left margin.
In Word 95, 97 and 2000, the Customize Bulleted List dialog is easier to understand, but doesn't give you quite as much control.
There are two positions to set (Figure 5):
- Bullet position – Indent at = How far in from the left margin do you want the bullet?
- Text position – Indent at = How far in from the left margin do you want the text?
Word 95, 97 and 2000 Tip: Once you have set the indents for your bullets this way, modify the List Bulletstyle to remove all the tabs from the style. If you visit the Customize List Bullet Style dialog again,you'll have to remove the tabs again, too.
Reference
- Grown ups don't use the bullets button on the toolbar.
- Grown ups don't use Format > Bullets and Numbering.
- To create bullets or dot point paragraphs, use a style (for example, the List Bullet style).
- To ensure that Word displays the List Bullet style so you can select it, do this.
- In Word 2002,on the Format menu, choose Styles and Formatting. The Styles and Formatting task pane will pop up. Down the bottom, in the Show box, choose "All Styles".
- In Word before 2002: On the Format menu, chooseStyle. The Style dialog box will pop up. In the Category box, choose "All Styles".
- Apply the List Bullet style to add bullets to your paragraphs.
- Set the indents for bullets by modifying the Numbering format of the style, not the Paragraph format of the style.For information on how to do the indents, see above. For more information on how to modify a style, see How to Modify a Style.
Next: Concept 6: Make changes, fix mistakes, edit your document as many times as you like or continue to read the Curiosity Shop.
Curiosity Shop: More about bullets
How to create several "levels" of bullets
To create several "levels" of bullets, each indented a little further from the left margin, the best way is to choose a style for each "level". An obvious choice of styles would be List Bullet, List Bullet 2, List Bullet 3 etc.Then, follow the instructions at How to create numbered headings or outline numbering in your Word Document. When the instructions there tell you to choose a Number Style,choose a Bullet from the drop-down list.
Bullets don't have to be round blobs
In Word 2002, you can use a picture as a bullet. Even in earlier versions, you can choose a symbol other than a round blob.Follow the directions above to get to Step 3.3, the Customize Bulleted List dialog box. In that dialog, click Character, then choose a character for your bullet. Look for appropriate characters in the Symbols orWingdings fonts. Ticks, crosses and arrows make good bullets. Or create a checklist by using an empty square as the bullet.
Brighten up a dreary day at work by making your bullets flash on and off
If you're having a bad day at work and you have Word 97 or above, you can make your bullets flash. Follow the directions above to get to the Customize Bulleted List dialog box. In that dialog, click Font, then choose the Text Effects tab. Choose the Blinking Background effect, ortry one of the other effects.
No, there is no sensible use for this feature except to have a bit of fun.
No, the bullets won't flash when printed on a piece of paper!
Next: Concept 6: Make changes, fix mistakes, edit your document as many times as you like


