


How to insert an Excel chart or worksheet range into a landscape page in a Word document
Insert Excel chart or worksheet
- Create a new section and make it landscape.
- Insert your Excel chart or selected range as a Picture.
Here's the problem: you have a Word document containing several pages, all in portrait orientation.
In the middle of your document, you need just one or two pages in landscape, to contain a chart or range of a worksheet from Excel.
This page explains how to do that.
Get organized before you begin
Make sure you can see what's going on
To insert a chart or range of a worksheet without going crazy, you have to be able to see what's going on.
So click the button that looks like ¶ (in Word 2007 and Word 2010 it's on the Home tab). That will display a ¶ sign for the end of every paragraph. If you don't like working while seeing ¶ signs, click the same button again at the end of the game to turn them off.
Get your text organized
Arrange your text so it looks like the text in Figure 1. That is, arrange your text so there is one empty paragraph where you want the landscape page to start.

Figure 1: Arrange your text so you have one empty paragraph where you want the landscape page.
Create the landscape page
Now we can create the landscape page (and we will later insert the Excel chart or worksheet range into that page).
Begin with the end in mind
To put a landscape page in the middle of some portrait pages, you need a new Section. And you need to make that Section landscape.
We are starting with a plain document containing several portrait pages. We want to end up with:
| Section 1: Portrait |
| Section 2: Landscape (for the Excel chart or worksheet range) |
| Section 3: Portrait |
How to create the landscape section
- Click in the empty paragraph where you want the landscape page to start. (That is, the empty paragraph shown in Figure 1.)
- In Word 2003 and earlier versions, do Insert > Break. Click Next Page, and OK. In Word 2007 or Word 2010, on the Page Layout tab, in the Page Setup group, click Breaks, and then click Next Page. You will see that the Status bar at the bottom of the screen now says "Sec 2" or "Section: 2" to let you know that you're in Section 2. (In Word 2007 or Word 2010, if you don't see "Section: 2", right-click the status bar and click the Section option.)
- Type "Put my Excel chart here" (or something like that). Press Enter once.
- Click at the beginning of the text you want after the landscape page chart, so the screen looks like Figure 2 (you'll have to imagine the insertion point flashing on and off!).

Figure 2: Click at the beginning of the text you want to appear after the landscape page.
- Now, create the section break to mark the end of section 2. To do that, in Word 2003 or earlier versions, Insert > Break. Click Next Page, and OK. In Word 2007 and Word 2010, Page Layout > Page Setup > Breaks > Next Page. (You will see that the Status bar at the bottom of the screen now says "Sec 3" or "Section: 3" to let you know that you're in Section 3.)
Make Section 2 landscape
To make Section 2 landscape, follow these steps:
- Click in the text that says "Put my Excel chart here". (And the Status bar at the bottom of the screen will say "Sec 2" or "Section: 2".)
- To make this section landscape:
- In Word 2003 or earlier versions, do File > Page Setup. On the Margins tab, click Landscape and then click OK.
- In Word 2007 or Word 2010, do Page Layout > Orientation > Landscape.
Quick check: Do File > Print Preview. You should be able to see your portrait pages, your landscape page and your remaining portrait pages.
Inserting the Excel chart or worksheet range
Paste the chart or worksheet range as a picture
- In Excel, and do ctrl-c. Or, select the cells you want to appear in your Word document and do ctrl-c. Instead of ctrl-c, in Word 2003 and earlier versions, you can do Edit > Copy. In Word 2007 and Word 2010, you can do Home > Copy.
- Switch to Word.
- In Word, triple-click the paragraph that says "Put my Excel chart here". (That selects the whole paragraph and its paragraph marker.)
- Now, paste the picture.
- In Word 2003 and earlier versions, do Edit > Paste Special and choose Picture (Enhanced Metafile).
- In Word 2007 and Word 2010, on the Home tab, click the bottom of the Paste split button and choose Paste Special. Then choose Picture (Enhanced Metafile).
- In any version, if you want to link the Excel workbook and the Word document (so the Word document will update whenever the Excel workbook changes, then click the Paste Link option). And click OK. (See Figure 3.)
Figure 3: Choose to paste as a Picture (Enhanced Metafile). If you need to link the picture, click Paste Link.
- The next step is to set the text wrapping so the picture is in line with text.
- In Word 2003 and earlier versions, double-click the chart or range you have just pasted, so you see the Format Picture dialog box. At the top of that dialog box, click the Layout tab. On the Layout tab, click In line with text and click OK.
Figure 4: In the Format Picture dialog box, on the Layout tab, choose In line with text.
- In Word 2007 and Word 2010, double-click the chart or range you have just pasted. This will open the Picture Tools Format contextual tab. In the Arrange group, choose Wrap Text > In line with text.
- In Word 2003 and earlier versions, double-click the chart or range you have just pasted, so you see the Format Picture dialog box. At the top of that dialog box, click the Layout tab. On the Layout tab, click In line with text and click OK.
- Done! You now have a landscape chart or region of a worksheet in your Word document. Use File > Print Preview to check. To fine tune the formatting, or sort out headers and footers, read on.
Fine tuning
You have your chart or region of a worksheet in Word. You can now fine-tune the layout or formatting.
- You can make the picture larger or smaller. To do that, click and drag the picture.
- You can change the margins just for Section 2. In Word 2003 and earlier versions, click the picture and do File > Page Setup. In Word 2007 and Word 2010, click the picture and do Page Layout > Margins.
- You can adjust the formatting. Double-click the picture and follow your nose.
- You can give the picture a border. In Word 2003 and earlier versions, click the picture and choose Format > Borders and Shading. In Word 2007 and Word 2010, double-click the picture and on the Picture Tools Format contextual tab, use the Picture Border menu.
- You can give the picture a caption. In Word 2003 and earlier versions, click the picture and choose Insert > Reference > Caption. In Word 2007 and Word 2010, click the picture and choose References > Insert Caption. See How to keep a figure on the same page as its caption for more information.
Headers and footers
Do you have headers and footers in this document? If so you might need this section.
If you have headers and footers in your document, then three things can pose problems:
- the header or footer was designed for the width of a portrait page, and looks silly on a landscape page
- you want to delete the header or footer on the landscape page
- you want the header and footer on a landscape page to be in portrait orientation.
By default, each section's headers and footers are linked to the headers and footers in the previous section. When a header or footer is linked to the previous header or footer then, if you change one, you change them all. So if you want the headers or footers for the landscape section somehow different from the sections before and after it, then you must unlink the headers and footers.
How to unlink headers and footers
To do this, start at the end of the document and move towards the front.
In Word 2003 and earlier versions
- Do ctrl-End to move to the last page in the document.
- View > Headers and Footers.
You'll see something like Figure 5, which shows the Header for Section 3. Word says "Same as Previous", which means that this header is the same as the header in Section 2.
Figure 5: Iin Word 2003 or earlier versions, find the Link to Previous button and click it to un-link this header from the previous section's header.
- Click the Link to Previous button to un-link the header. That will give Section 3 its own header.
- Now, click the Show Previous button (the one with the left-pointing arrow) to view the header for Section 2. Unlink it, too, using the Link to Previous button.
In Word 2007 or Word 2010
- Do ctrl-End to move to the last page in the document.
- Insert > Header > Edit Header (or, Insert > Footer > Edit Footer).
You'll see something like Figure 6, which shows the Header for Section 3. Word says "Same as Previous", which means that this header is the same as the header in Section 2.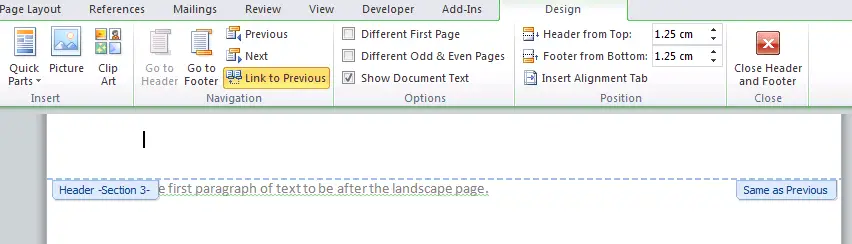
Figure 6: In Word 2007 or Word 2010, find the Link to Previous button and click it to un-link this header from the previous section's header.
- Click the Link to Previous button to un-link the header. That will give Section 3 its own header.
- Now, click the Previous button to view the header for Section 2. Unlink it, too, using the Link to Previous button.
So now you have 3 sections with 3 completely independent headers. Edit or delete them to suit your needs. If you want really absolutely need a portrait-oriented header on a landscape page, see How to put a portrait page number on a landscape page.
Repeat the steps in Part 5 for the footers, if necessary.
This page was especially written for Claire.